
| 일 | 월 | 화 | 수 | 목 | 금 | 토 |
|---|---|---|---|---|---|---|
| 1 | ||||||
| 2 | 3 | 4 | 5 | 6 | 7 | 8 |
| 9 | 10 | 11 | 12 | 13 | 14 | 15 |
| 16 | 17 | 18 | 19 | 20 | 21 | 22 |
| 23 | 24 | 25 | 26 | 27 | 28 |
- ipad
- synology
- GitHub
- Series
- GT-S80
- dataframe
- pandas
- Python
- index
- Numpy
- keras
- 알고리즘
- DFS
- mariadb
- pip
- SPL
- mean
- Splunk
- CNN
- Button
- pycharm
- install
- Lotto
- imread
- 삼성소프트웨어멤버십
- javascript
- RNN
- E-P1
- SciPy
- LSTM
- Today
- Total
목록공부 (287)
잠토의 잠망경
오류 상황 단일 값에 대하여 DataFrame을 만드는 경우 def sample01(): ''' 모든 값이 scaler인 경우 오류 :return: ''' import pandas as pd from pandas import DataFrame datas:DataFrame = pd.DataFrame({'col1':2, 'col2':1}) # ValueError: If using all scalar values, you must pass an index print(datas) solution 1 index를 지정한다. github def sample02(): ''' 모든 값이 scaler인 경우 :return: ''' import pandas as pd from pandas import DataFrame d..
 [Python] mariadb
1. pymysql install pymysql 2. 첫번째 행 갖고 오기 github data = cursor.fetchone() def sample01(ip:str, port:int, user:str, passwd:str, db:str, query:str)->tuple: """mariadb 첫번째 행 갖고 오기 Args: ip: ip port: port user: id passwd: password db: 기본 db Returns: 없음 """ import pymysql db = pymysql.connect(host = ip, port = port, user = user, passwd = passwd, db = db, charset='utf8', autocommit=True) cursor = db.c..
query의 order by와 유사하지만 주의할 사항이 있다. 제한이 있어서 10,000까지만 정렬되며 이상 넘어가면 data가 사라진다. 모든 것들에 대한 정렬을 원하면 아래를 참고하자. | Sort xxx `comments("일반적이지만 10000개가 넘어가면 사라짐")` | Sort - xxx `comments("일반적이지만 10000개가 넘어가면 사라짐")` | Sort 0 xxx `comments("무제한 정렬")` https://docs.splunk.com/Documentation/Splunk/latest/SearchReference/Sort sort - Splunk Documentation Download topic as PDF sort Description The sort command s..
 [Splunk] 새로운 row 추가 후 일부 변경
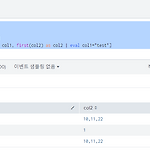
1. 새로운 값들을 추가하고 일부를 변경 | makeresults | eval col1="a", col2="10,11,22" | append [| makeresults | eval col1="b", col2="1"] | appendpipe [| makeresults | stats first(col1) as col1, first(col2) as col2 | eval col1="test"] | table col1, col2 2. 다음과 같다.
 [Splunk] DBX query 직접 날리기
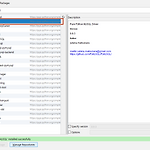
SPL 안에서 직접 Query를 날릴 수 있어서 편하다. 1. 기본 형태 | dbxquery connection="192.168.0.42" query="SELECT * FROM mellowlee.splunk_test_db" 2. 직접 날려본 결과 DashBoard에서 해보기 1. 입력 추가를 하고 연필을 선택한다. 2. 아래와 같이 token을 입력한다. 3. 실제 이용할 SPL을 수정한다. 아래와 같이 | dbxquery connection="192.168.0.42" query="SELECT * FROM mellowlee.splunk_test_db where 1=1 and C_NAME='$MY_C_NAME$'" 4. 입력을 하면 잘 조회한다.
관련 github https://github.com/yiwonjae/Project_Stock_Markets_Python/blob/master/Sample01/20200415_01.py 방법 1 def Make_Date_01(): #https://www.programiz.com/python-programming/datetime/strftime from datetime import datetime, timedelta # 현재 시간 얻어오기 now = datetime.now() # 현재 시간을 얻어 온다. before = now - timedelta(days=10) # 현재 시간 기준 10일 전 시간을 얻는다. print(before) print(now) strBefore:str = before.strftim..
 [Splunk] Comment 붙여보기
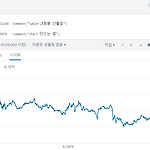
SPL 내에서도 주석을 붙여볼 수 있다. index="mynas_idx01" | table S_DATE, C_NAME, S_CLOSE `comment("table 내용을 산출중")` | where C_NAME = "AP위성" | chart avg(S_CLOSE) by S_DATE `comment("chart 만드는 중")` 아래와 같이 SPL이 동작하는데 영향을 미치지 않는다. https://answers.splunk.com/answers/48865/add-a-comment-to-a-search.html
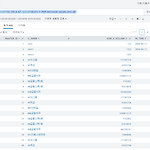
 [Splunk] DashBoard, 시간, 드롭다운
검색 내용을 DashBoard에 넣기 index="mynas_idx01" | table S_DATE, C_NAME, S_CLOSE input 값 통한 내용 변경해보기 드롭다운 만들어보기 예시 화면 [편집]을 클릭한다. [+입력 추가]를 클릭한다. [▼ 드롭다운]을 클릭한다. [펜]을 클릭한다. 레이블을 바꾸고 해당 내용을 다른데서 쓸 수 있도록 토큰을 정의한다. ※ 토큰을 사용할 때는 $토큰$ 형태 이며 여기서는 $COMPANY$ 이다. 또한 드롭다운 내용은 동적으로 내용을 넣어준다. index="mynas_idx01" | table C_NAME | dedup C_NAME SPL 내용을 기입한다. 그리고 레이블 및 값으로 사용될 필드를 저장해야한다. 여기서는 C_NAME을 지정하였다. 사용은 $C_NAM..